Crafting is a fun and fulfilling activity that allows you to express your creativity and make beautiful things. However, one of the challenges of being a crafter is keeping your supplies organised. It can be difficult to focus on your projects if you’re constantly struggling to find the right tool or material or if your workspace needs to be more organised and organised. This article will share some tips and tricks for organising your craft supplies so you can enjoy a stress-free and productive crafting experience.
Assess Your Space and Supplies
The first step is to take stock of what you have and where you plan to work. Look at the available space in your crafting area and decide how much you can dedicate to storage. Assess your supplies and determine their categories: paper, fabric, yarn, beads, tools, etc. Once you understand what you have and how much space you must work with, you can start planning your strategy.
Create Zones
Creating designated zones for each category of supplies is helpful to keep your belongings organised. For example, you might have a fabric zone with shelves or cubbies for your fabric stash, a paper zone with drawers or organisers for your paper scraps and cardstock, and a tool zone with pegboards or toolboxes for your scissors, rulers and other tools. Creating zones helps you keep like items together and makes it easier to find what you need when you need it.
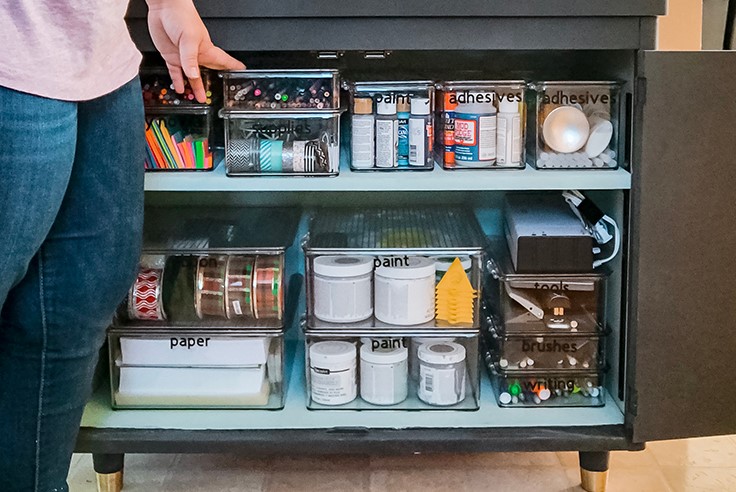
Invest in Storage Solutions
Investing in good quality storage solutions is vital to keeping your supplies organised. Consider using clear plastic containers with lids for small items like beads or buttons or drawer organisers for paper and cardstock; for more oversized items like fabric or yarn, open shelving or cubbies can be a great way to store your supplies while still keeping them accessible. For tools, consider using pegboards or toolboxes with dividers to keep everything in its place.
Label Everything
Once you have your storage solutions in place, labelling your supplies is a great way to keep everything organised and easy to find. Labelling helps you quickly identify what’s inside a container or drawer without opening it up and sifting through everything. Use a label maker or printable labels to create clear, easy-to-read labels for each storage container.
Create a System for Storing Scraps
One of the biggest challenges of crafting is dealing with scraps. Whether it’s leftover fabric, paper, or yarn, scraps can quickly pile up and become overwhelming. Creating a system for storing your scraps can help you make the most of your materials and reduce waste. Consider using clear plastic bins or hanging organisers to sort your scraps by colour or size. You can also use scraps to inspire future projects or donate them to local schools or crafting groups.
Rotate Your Supplies
Finally, consider rotating your supplies to keep your crafting experience fresh and exciting. Pack away materials that you’re not currently using and bring out something new to work with. This will not only keep your crafting space from getting too cluttered, but it will also help you stay inspired and motivated to try new things.
Organising your craft supplies can be daunting, but it’s worthwhile. A well-organised crafting space can help you stay focused and motivated, making it easier to find what you need when needed. By assessing your space and supplies, creating zones, investing in storage solutions, labelling everything, keeping your workspace clutter-free, creating a system for storing scraps, and rotating your supplies, you can create a stress-free and productive crafting experience.


